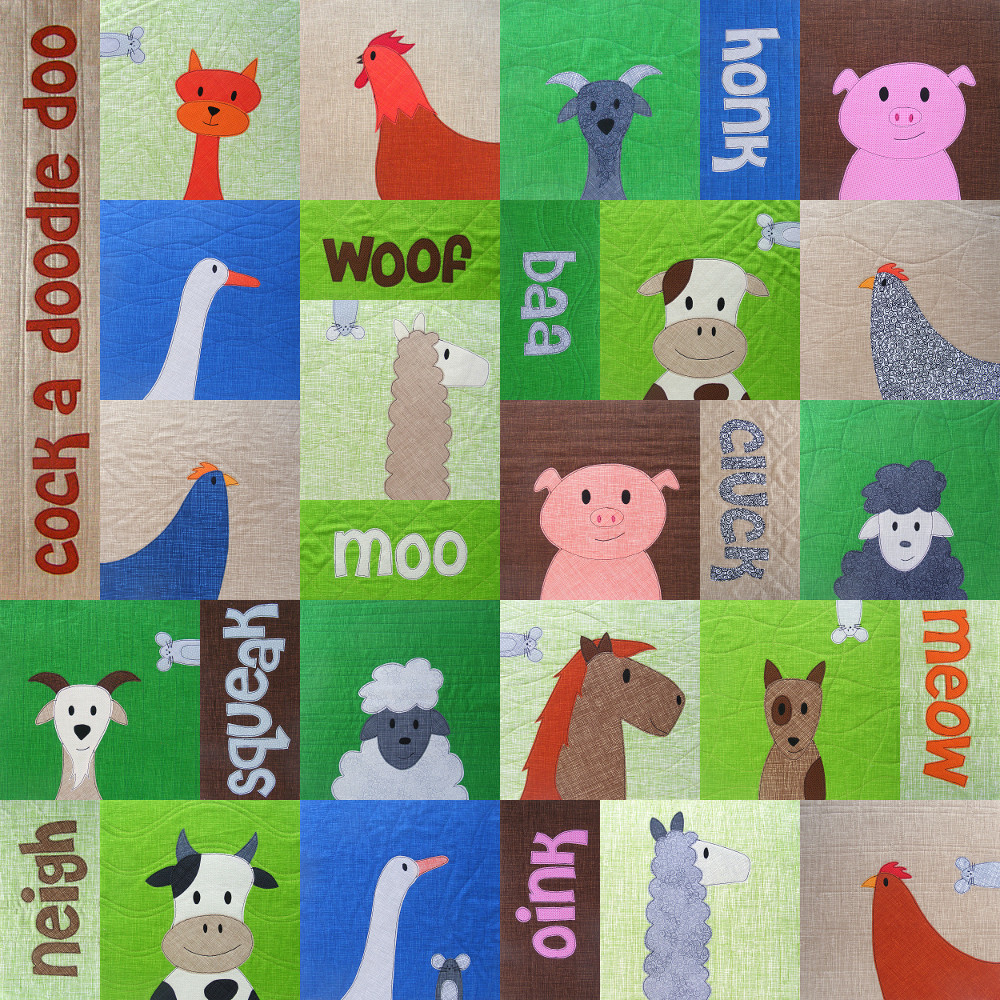
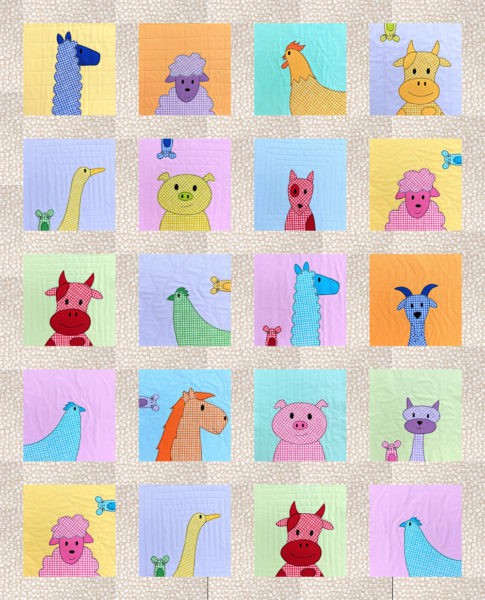
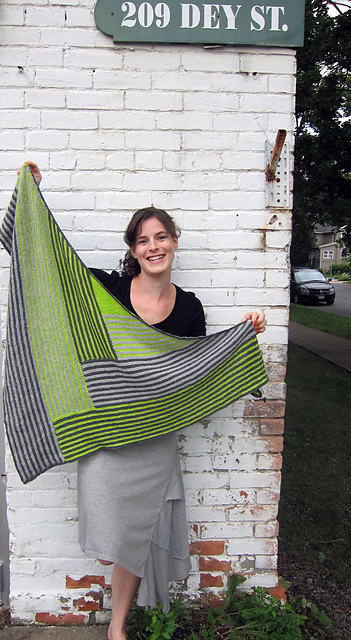
I’ve gotten a lot of questions lately asking for suggestions for the background colors of the Noisy Farm quilt pattern.
The cover sample you see above is from before I had fabric bundles in my shop, and most of the fabrics I used are no longer available.
One of the things I love about the way I do fabric bundles now is that you can use any bundle for any quilt. Here’s an example of three quilts that all use the Warm Neutrals fat quarter bundle for the animals – but different bundles for the background colors.
Changing just the background colors really changes the whole feel of the quilt – and I love them all!
So when people ask for suggestions for background colors for the Noisy Farm pattern – I want to tell them they can use anything! Go totally bright with the Solid Rainbow! Go a little more subdued with Box of Crayons! Go baby sweet with Rainbow Sherbet! Go natural with Green Batiks! Want even more suggestions? Go to the Noisy Farm pattern listing and look at the additional photos. There are a bunch showing finished quilts that other people have made with different fabrics than my samples.
For my new version of the Noisy Farm quilt I used Rainbow Sherbet for the background blocks. I went totally wild with the animals and using the Gingham Play fat quarter bundle. Gingham always says “farm” to me and I can’t wait to make the animals in fantasy colors.
One more change – I made this one a silent farm. 🙂 I left off the half-blocks with animal sounds and added sashing. I get a lot of requests about adding sashing to a Quilt As You Go quilt. There’s a tutorial here showing how you can reset (almost) any of my quilt patterns with added sashing. I even did the math for you for all the sizes. 🙂
If you’ve made any of my quilt patterns using a different color scheme – please share! Seeing all the different versions of my patterns makes me Muppet-arms-flailing happy – and it’s a great resource for your fellow makers out there to see different options. 🙂
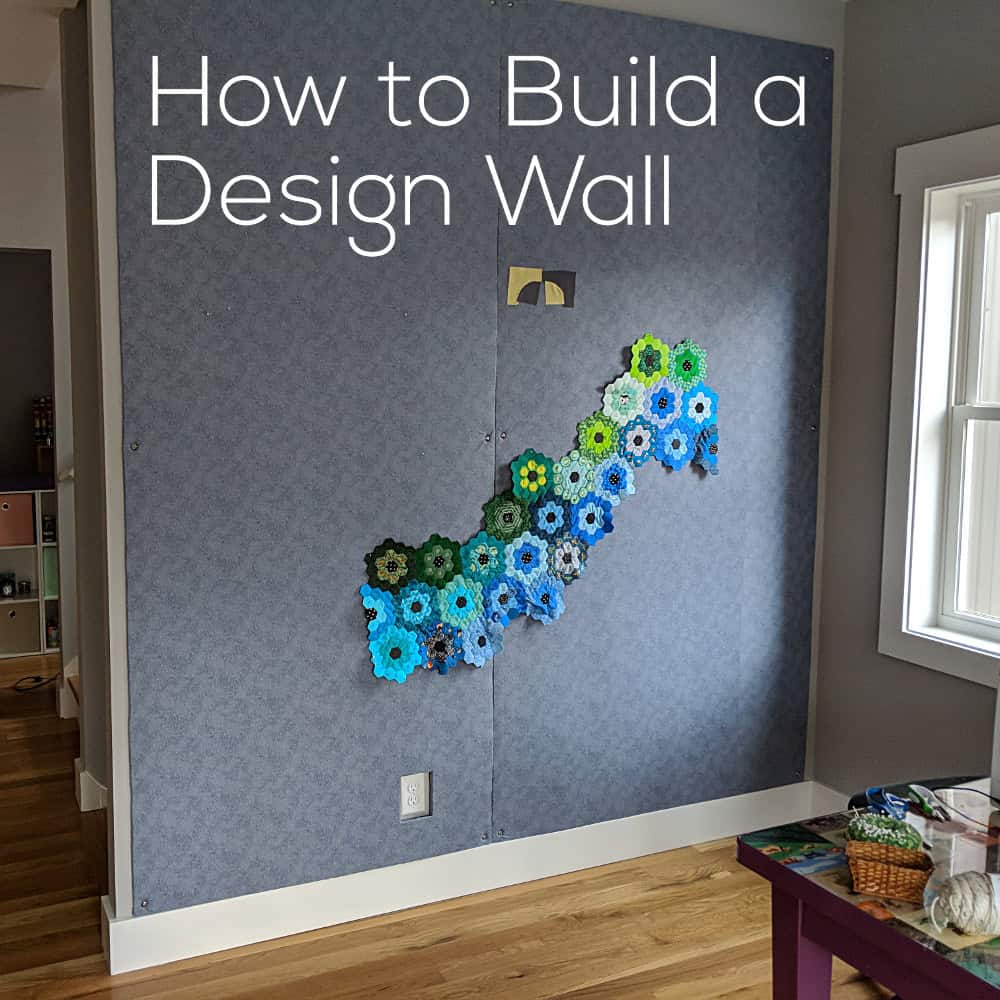
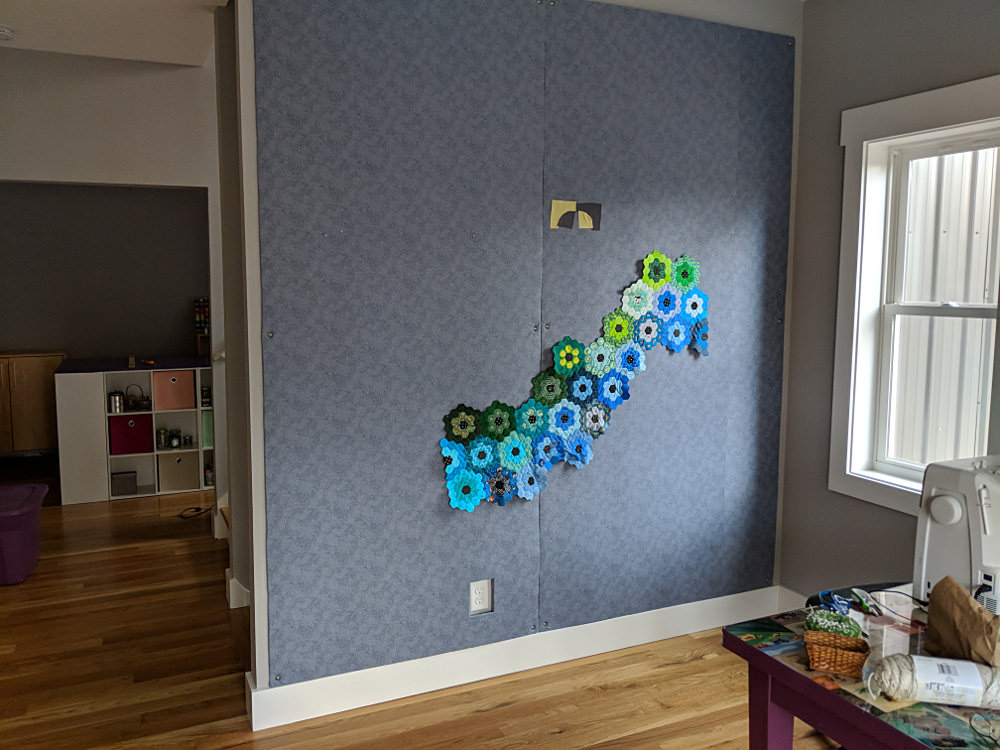
I finally have a quilt design wall in my new house and I’m so excited! There really is nothing like being able to step back and see an entire quilt like this!
And I’m going to show you (in excruciating detail) how I built mine – including the specific materials I used. I’ll also show you a bulletin board I made for my husband using the same method. I’ll even show you how to do that little cutout around the electrical outlet.
Ready?
Here we go!
To start with – I like to use foam insulation board. Styrofoam sheets are less expensive – but pinning into styrofoam gives me the willies. It’s a real nails-on-the-chalboard reaction so I don’t do it. Look for the 4 ft x 8 ft sheets of foam insulation board at your home improvement store. I like the ones that have a metallic foil material on one side.
I covered my board with flannel because I want to have both options – being able to pin into it but also being able to just smooth blocks up there and let them cling to the flannel.
Click through so you can see the flannel print close up. It’s a nice tone on tone print that looks interesting when there’s nothing on the board, but is subtle enough not to distract me from any design I’m working on up there. Later I’ll show you a different kind of option.
For my last quilt design wall I glued the fabric to the board – but that meant I couldn’t wash it, or easily change it if it got faded. This time I did the whole thing with pins.
Start out by piecing together enough fabric to completely cover your board, and wrap around each side with a couple of inches to spare. Press everything nice and smooth.
Lay your insulation board foil side up and cover it with the fabric – getting the fabric as centered as possible.
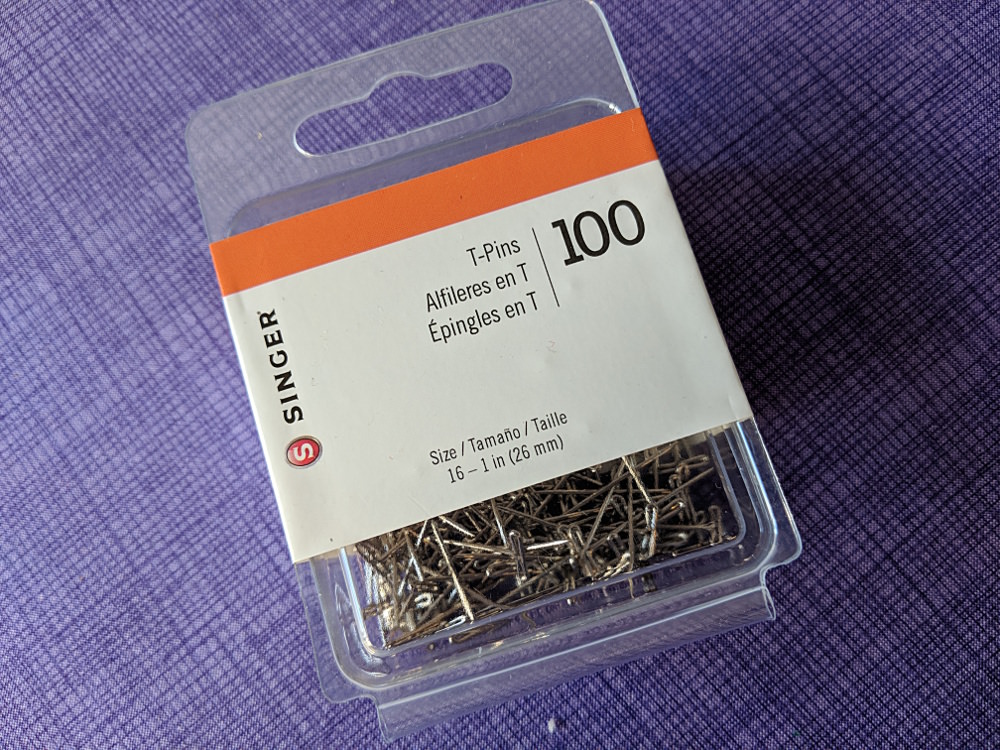
Start pinning your fabric into the sides of the insulation board. I used these 1-inch T-pins.
Basically – I used the exact same method I use to prepare fabric for framing – just on a larger scale. You can watch that video here.
Keep adding pins, pulling the fabric smooth but not stretching it, until you have pins all the way around your board every 1-2 inches.
Flip your board over so you’re working from the back.
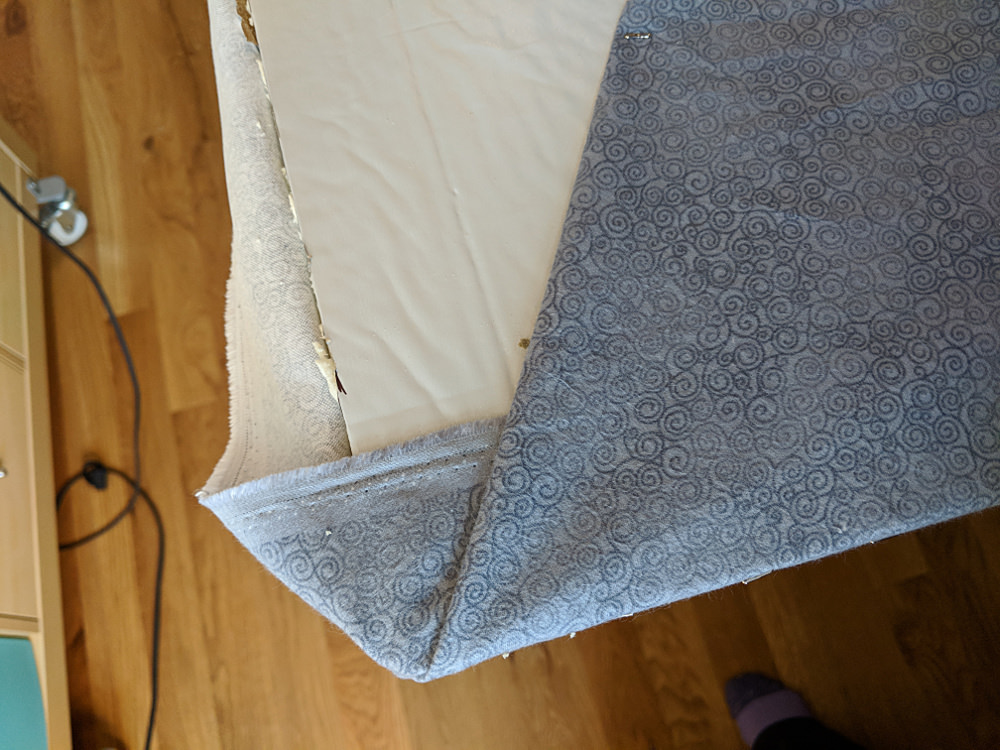
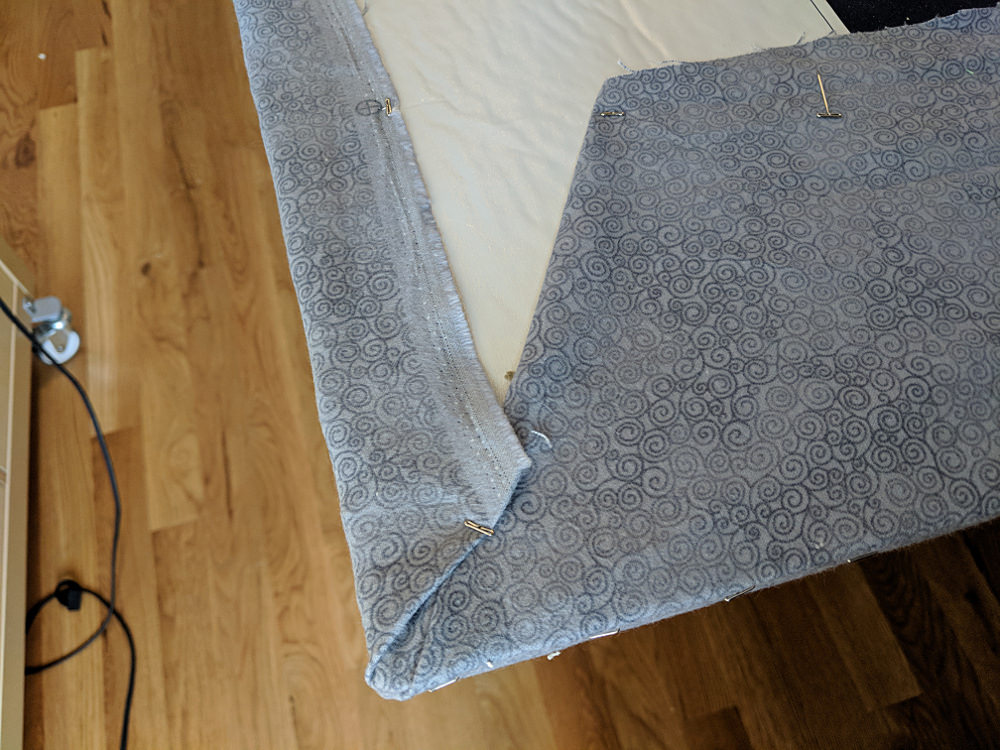
Fold in one corner, then fold in one side. Insert some of the T-pins at an angle so they hold the fabric flaps in place, but don’t poke through the front.
Fold in the other side. Now your corner is nice and neat!
(See how pretty that tone-on-tone Jazz print is?)
Continue around the back of the board, securing the excess fabric with T-pins inserted at a slant. Remember – the side pins are the ones really holding the fabric in place on the front of the board. These are only holding the excess fabric in place, so you only need a pin every 8-12 inches or so.
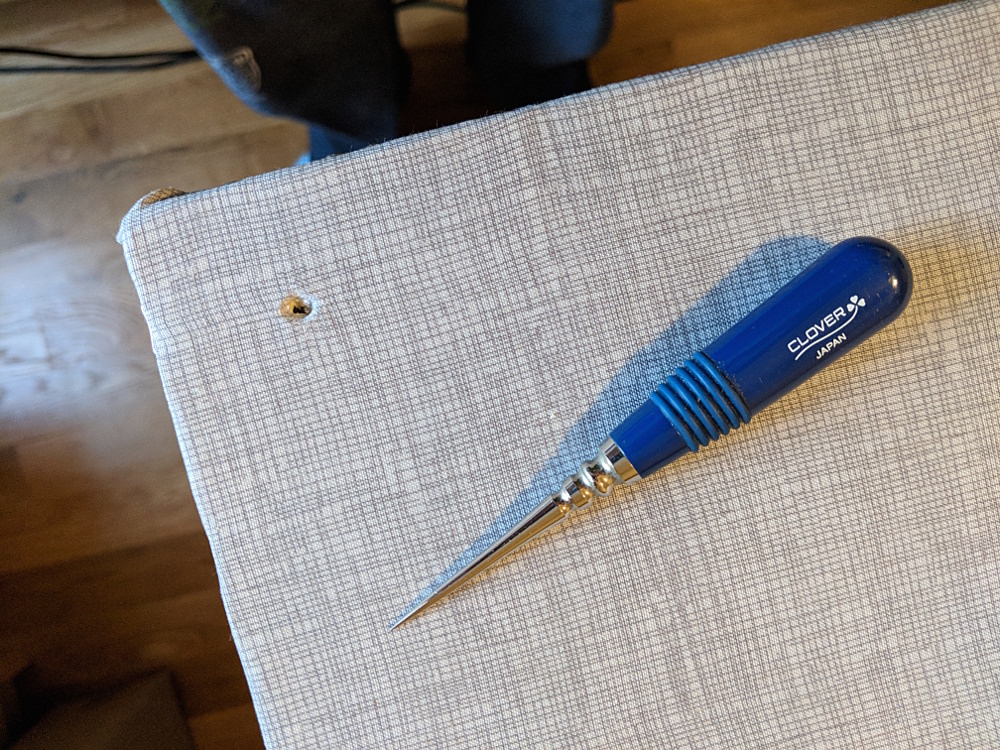
Use an awl or other sharp tool to poke a hole in each corner of the board (mine is 1 inch in from each edge) and one more in the middle of the longest edge.
This step is important! Don’t think you can just screw right through the fabric. The bit or the screw will catch the fabric and yank it into an awful twist, ruining all that work you did getting everything nice and smooth.
Hold the board just where you want it on the wall and mark through each of those holes with a pencil. Take the board away and insert a wall anchor at each of those spots.
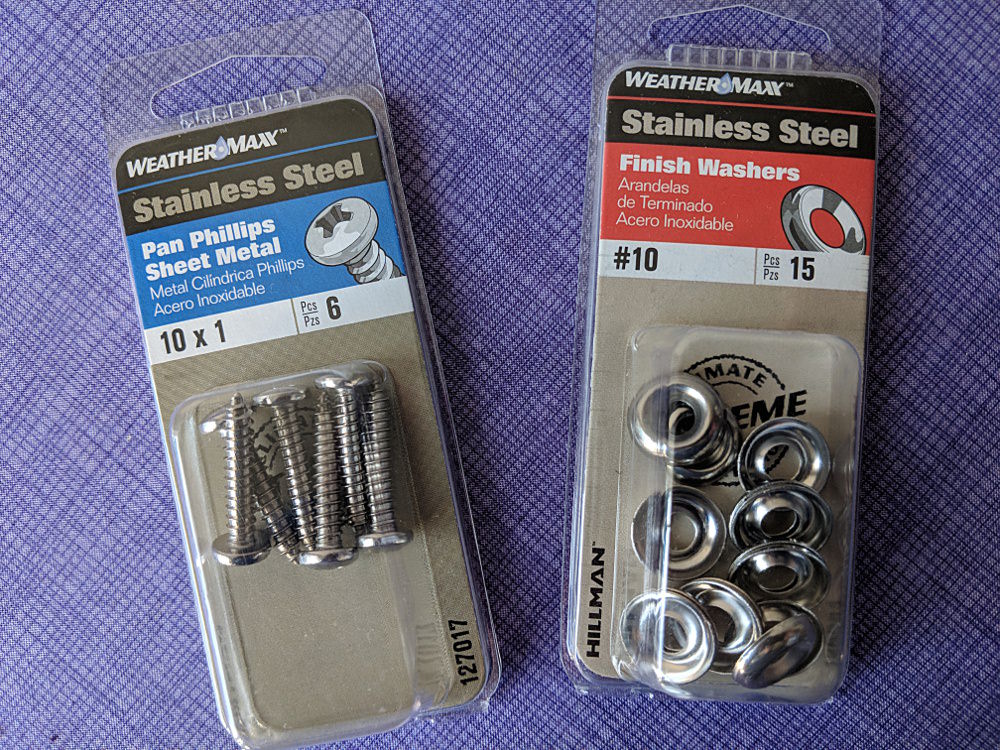
Now screw the board into those wall anchors!
I used these nice stainless steel screws and washers.
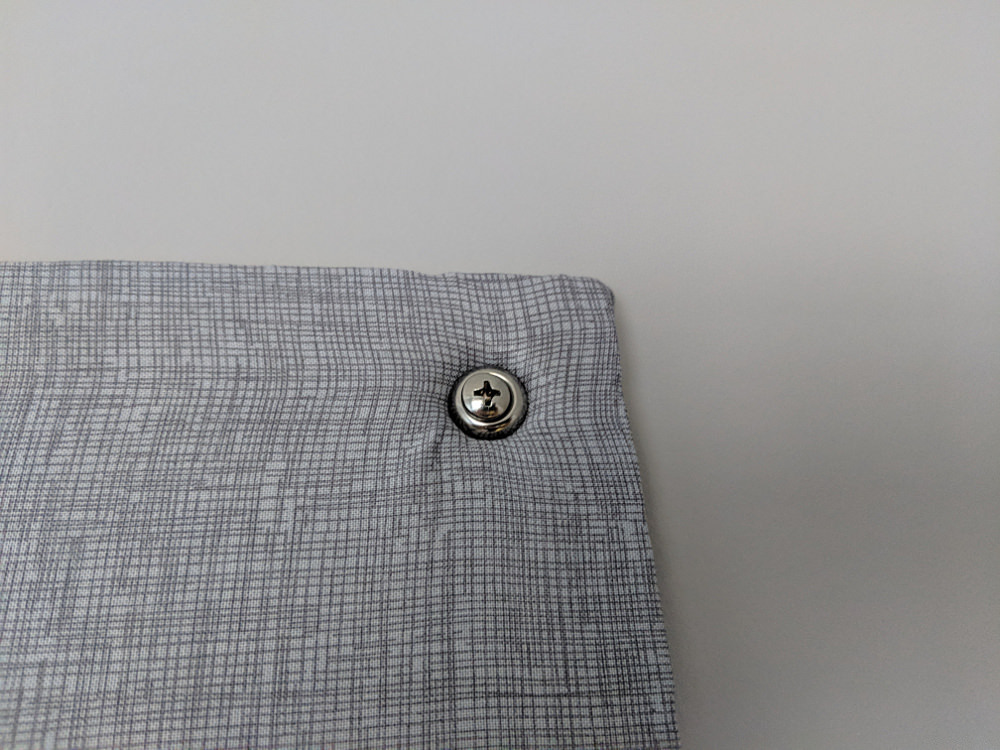
You definitely need to use some kind of washer so that over time the head of the screw doesn’t just pull through the soft foam. See how nice these look?
I like to screw it in tight enough that it kind of dimples into the surface of the foam. That way I can skim quilt blocks right over the screws if I want to.
What About Electrical Outlets?
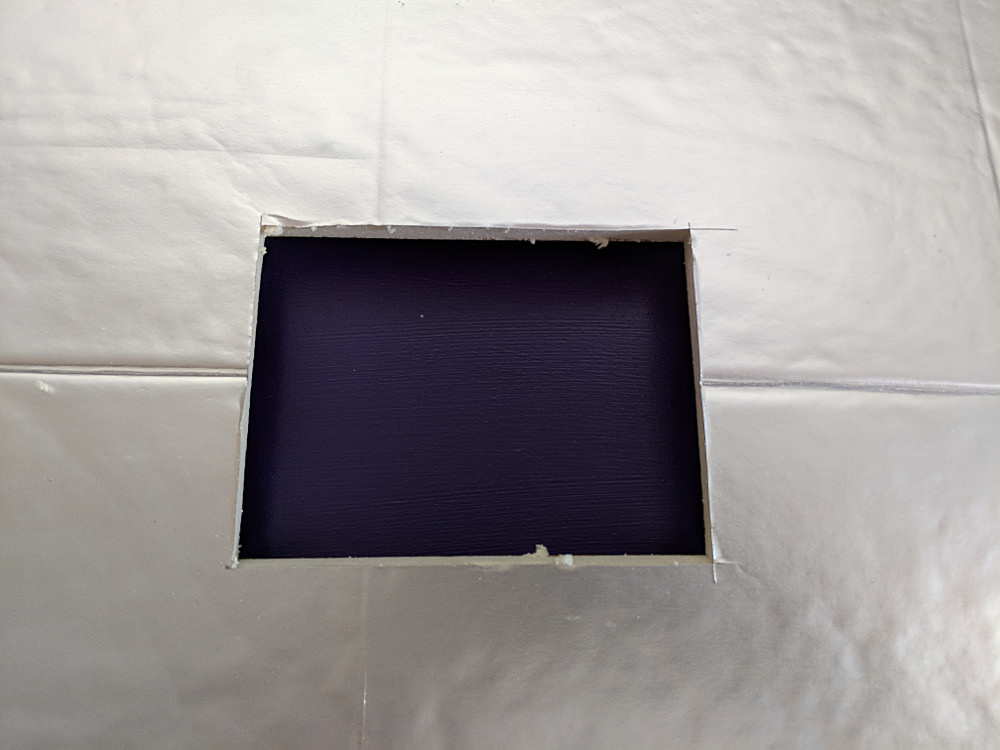
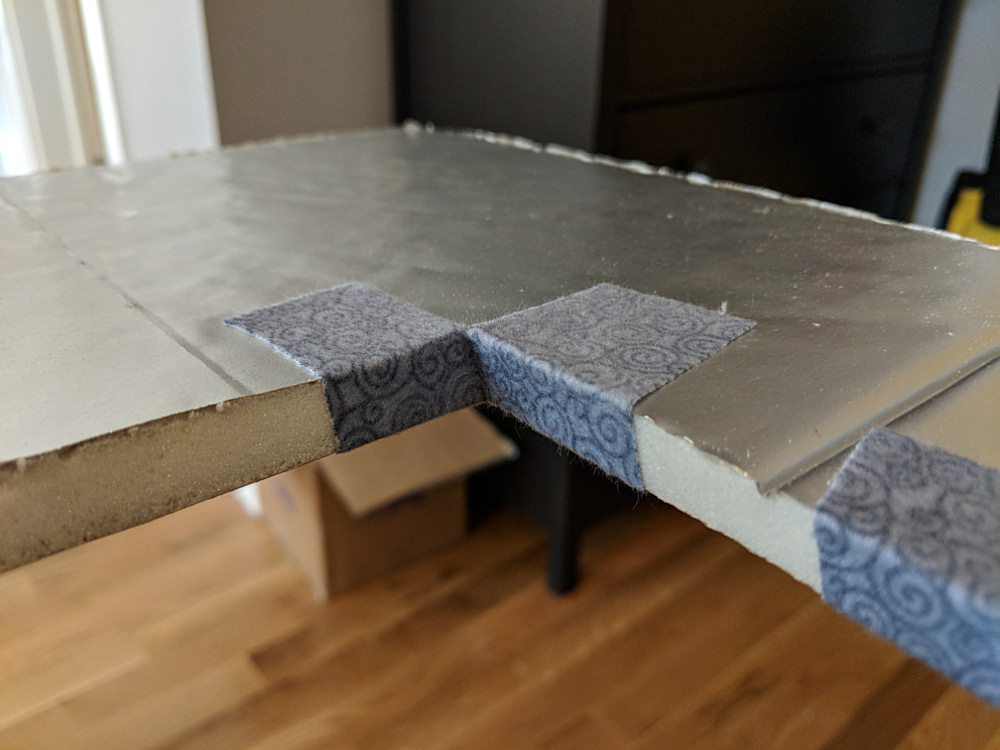
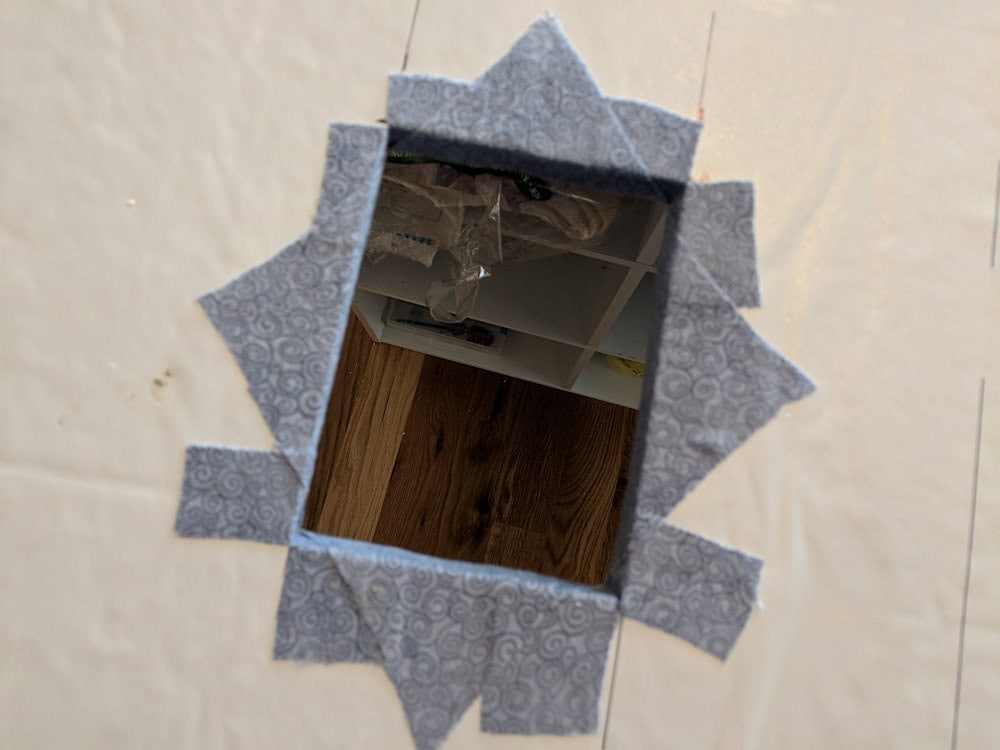
So my first board of my quilt design wall was easy – but the second one was going to go right over an electrical outlet. I wanted to be able to continue to use that outlet, so I needed to cut a hole in the board and finish those edges.
Don’t worry – it’s not hard!
Measure your space and cut a hole in your board just a little bit bigger than your outlet cover.
This stuff is easy to cut with a simple X-acto blade.
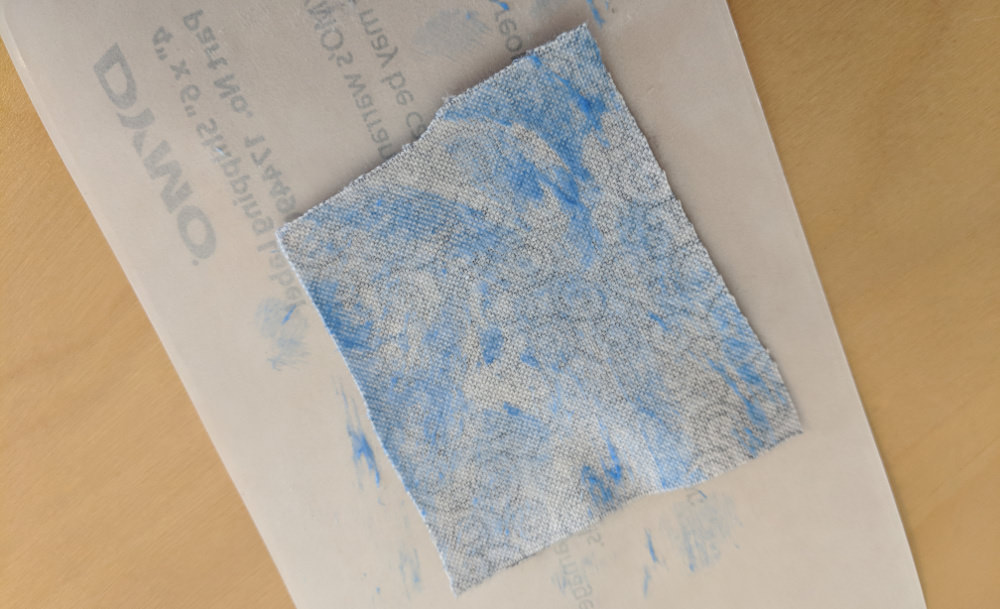
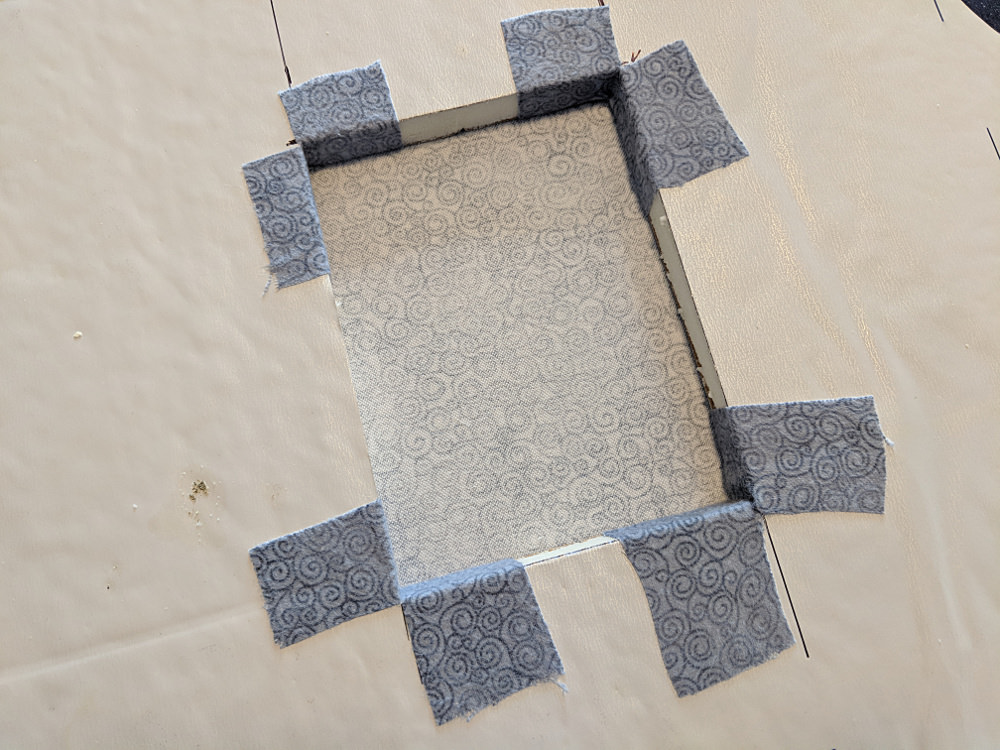
Now cut four squares of fabric roughly 2-3 inches square. It doesn’t not have to be exact – or even especially neat, as you can see with mine.
Cover the back of one square of fabric with glue.
I used a Uhu glue stick – not my fabric glue stick. I wanted a permanent hold here.
Stick the square right into one corner of your cutout and press it in place, as shown.
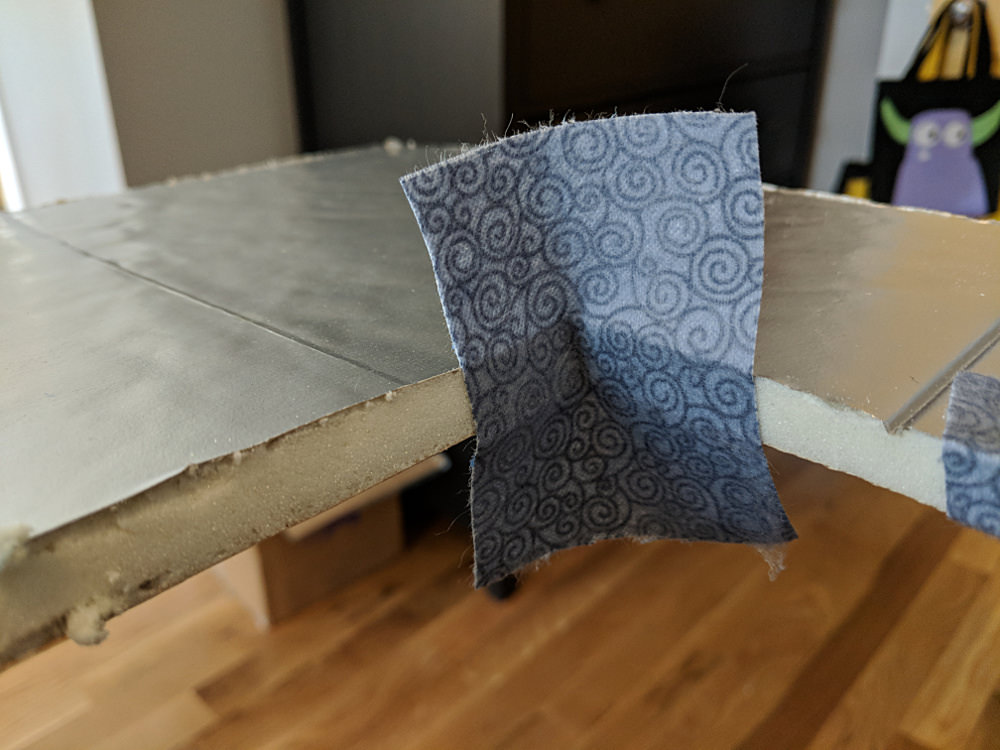
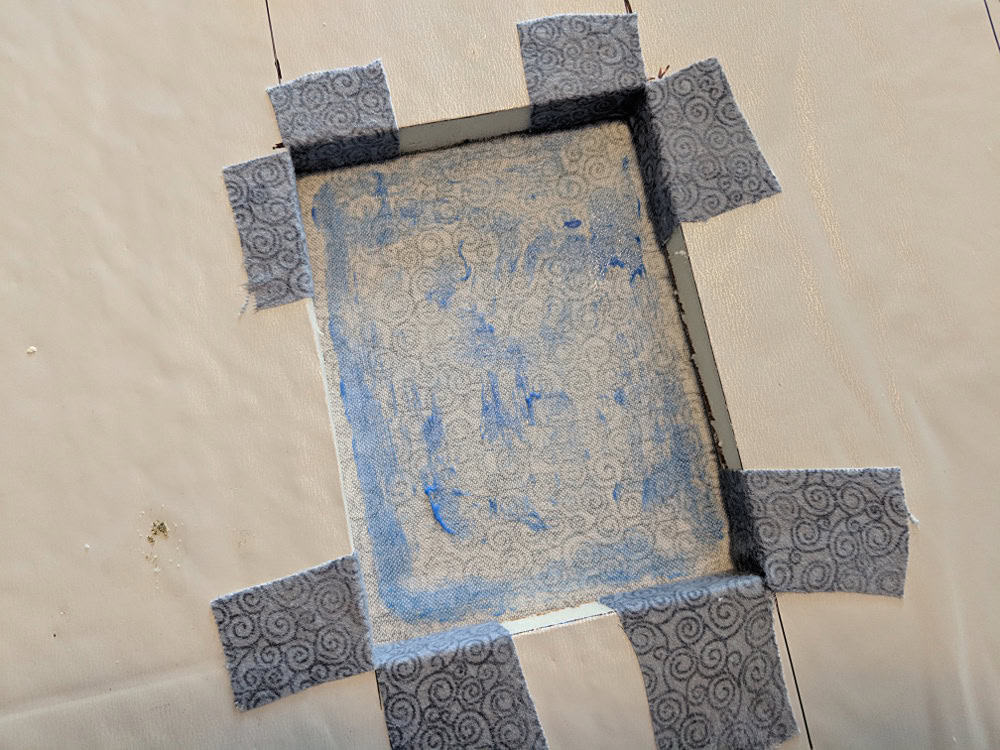
Now use a sharp pair of scissors to snip down from the top and up from the bottom – right on the fold created.
You want to cut very close to the surface of the board – with just a few threads to spare.
Now folds those flaps down and smooth them onto the front and back of the board.
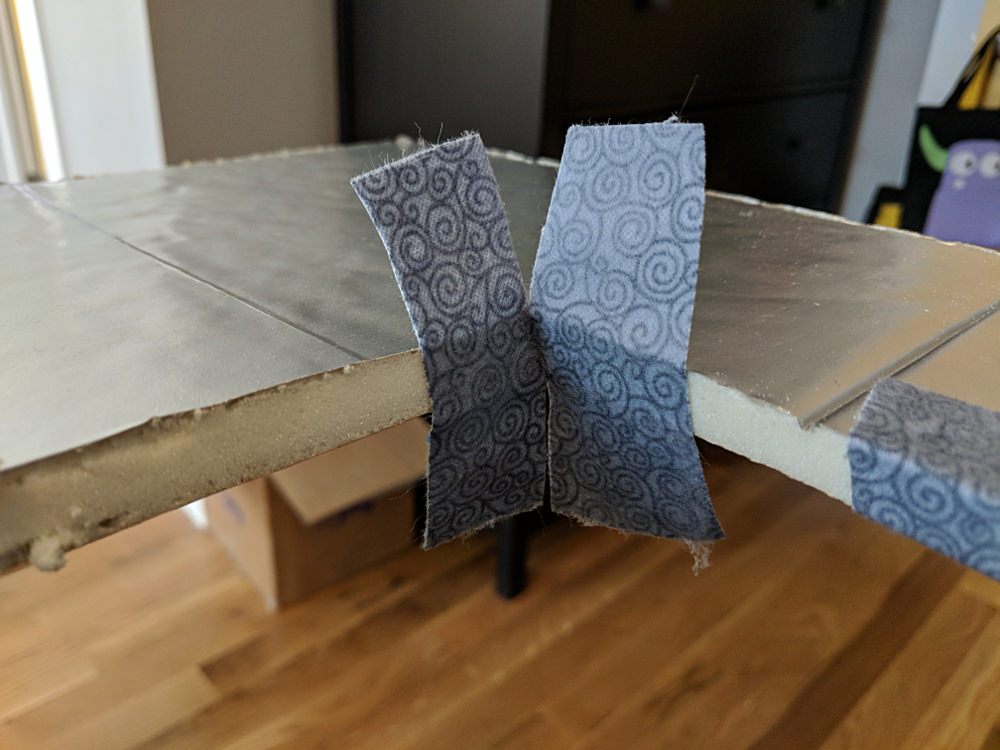
Repeat for the other three corners.
Now just cover your board like a showed in the first part of the tutorial. Pretend that hole isn’t even there.
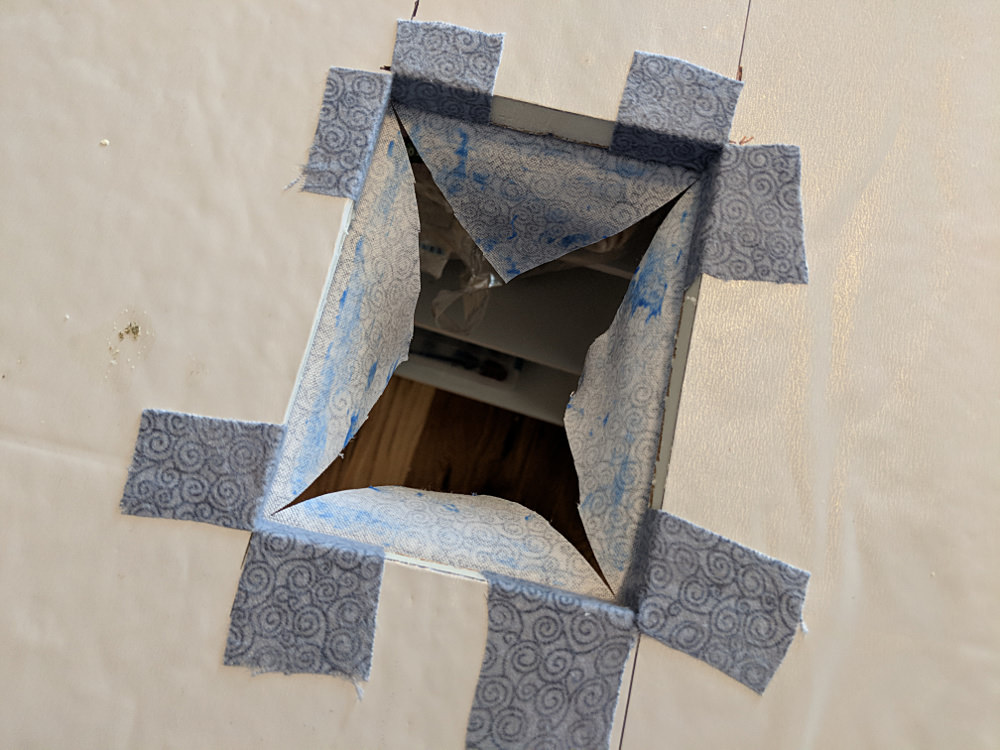
When you flip your board over, you’ll see the back of that fabric through the hole.
Make sure the board is on a flat surface (so you have something to press against) and coat all the fabric inside the cutout with glue.
Now use a pair of sharp scissors to cut an X in that fabric from corner to corner.
Pull those triangle flaps to the back side of the board and smooth them in place.
Sorry – I was using my camera’s autofocus and it focused on what it could see through the hole, instead of the fabric treatment around the hole. But I think you can still see what I did, blurry as it is. 😛
That’s it! This board is ready to hang, just like the first one.
Ta da! I have a quilt design wall!
Pieced Bulletin Board
I needed my board to be pretty simple so it wouldn’t distract from whatever I’m designing on it.
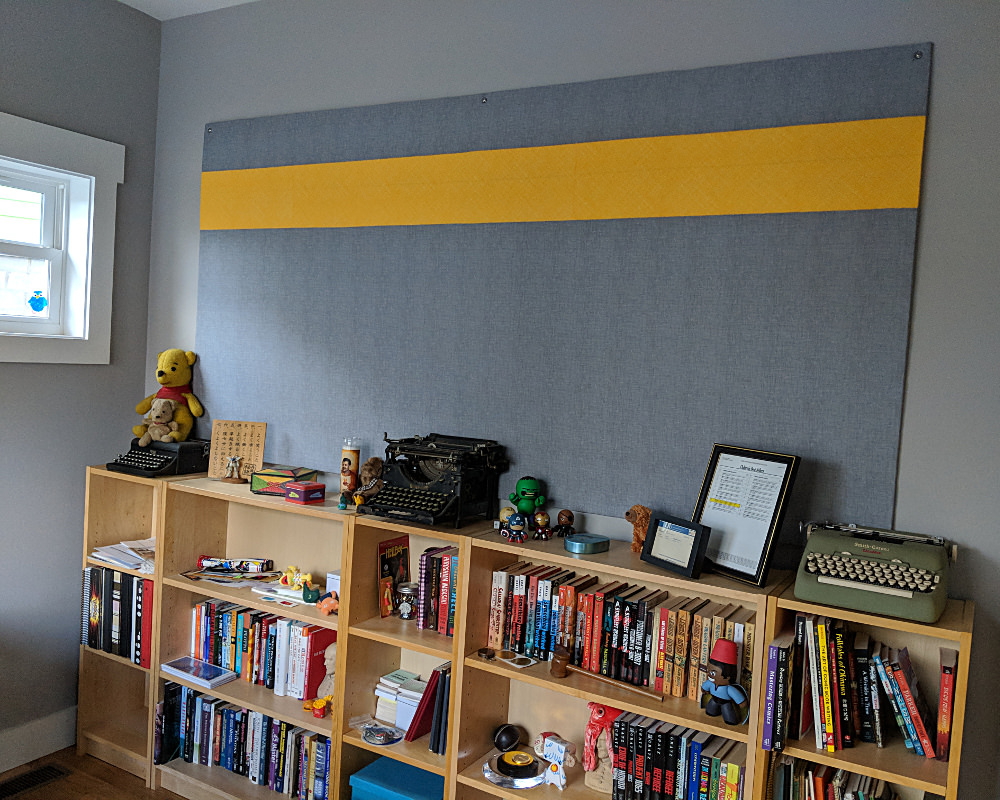
But my husband wanted a similar board to outline his next book on – and he wanted it to have a bit of design. Nothing too fancy – but just a little extra pizzazz.
Here are the fabrics he chose.
He doesn’t need fabric to cling to his board, so I just used regular quilting cotton instead of flannel.
And here’s his finished bulletin board.
It’s all ready for him to start hatching his next novel!
I love having a quilt design wall again! It makes it so much easier to really SEE the layout of a quilt in progress.
Here are handy links to all the posts about quilting tools and supplies.
This post contains affiliate links. That means I make a little commission if you buy something after clicking through. All affiliate links are marked with an *.
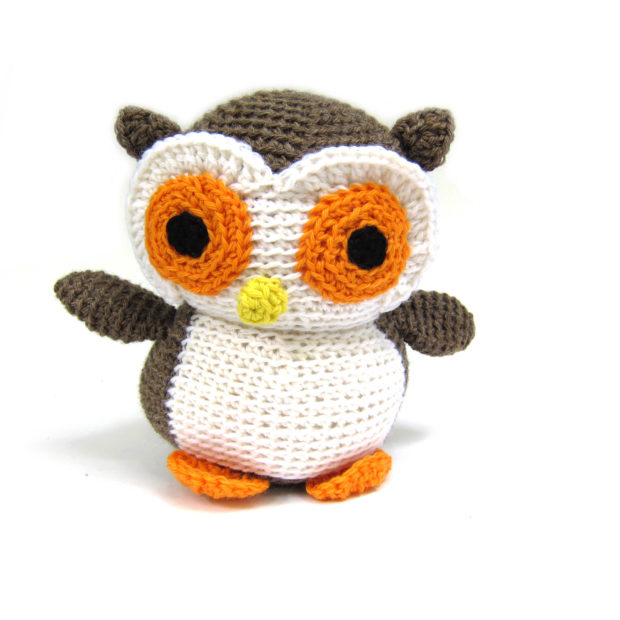
Kawaii means ‘cute’ in Japanese, and when it comes to amigurumi… there’s a lot in the face!
I make most of my amigurumi as bigger plush toys, that are cute… but not super cutesy. Real human people have their eyes at the halfway point of their face, and this is where I put a lot of my animal’s eyes:
Cute, right?
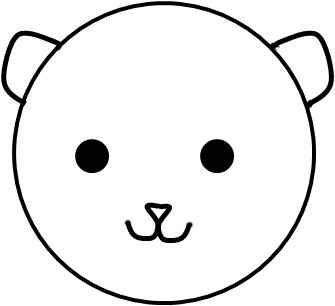
I’ve drawn up a little graphic of what it looks like to put eyes at the halfway point on a sample bear:
But what if you want to make your amigurumi even CUTER? Even more kawaii?
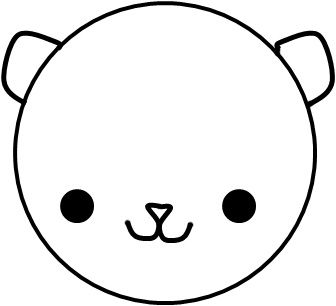
Try putting the eyes even lower on the face, and spaced further apart! Check out this cutie!
Even cuter! Squee!
Play around with eye placement on your next stuffed animal!
In fact, one of my most popular blog posts is this one where I talk about putting colors together.
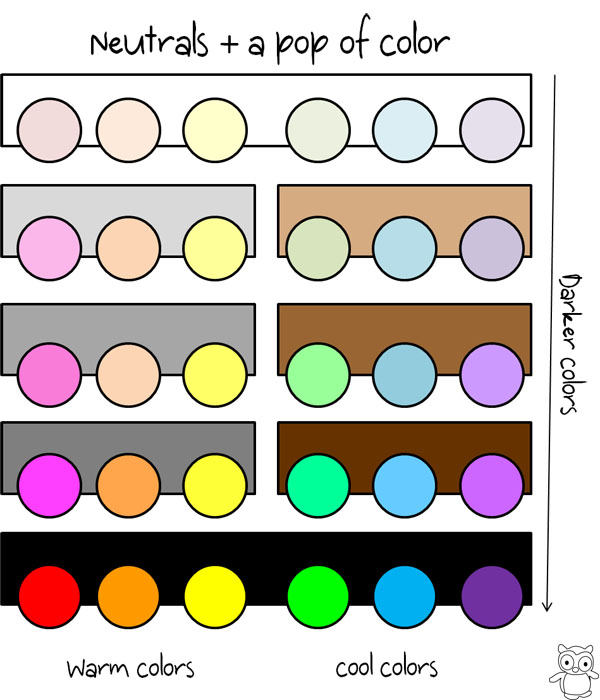
But maybe you’re not into wearing lots of different colors. I have another great color combo for you: a neutral + a pop of color!
How to do it
My philosophy for mixing neutrals and color is to mix warmth, but keep the darkness the same. For example, I mix a warm color with a cool neutral… but keep them about the same lightness.
Here’s a little chart showing some ideas:
See it in action!
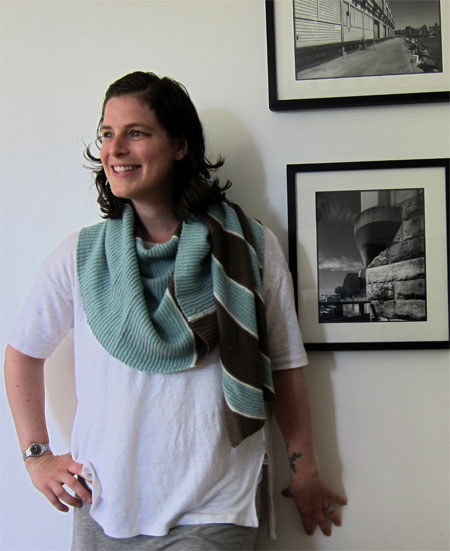
I just finished knitting Dromos (well… actually, I finished knitting it a long time ago, but I just finished weaving in the ends!), and I just love it. It combines a medium brown with a soft blue.
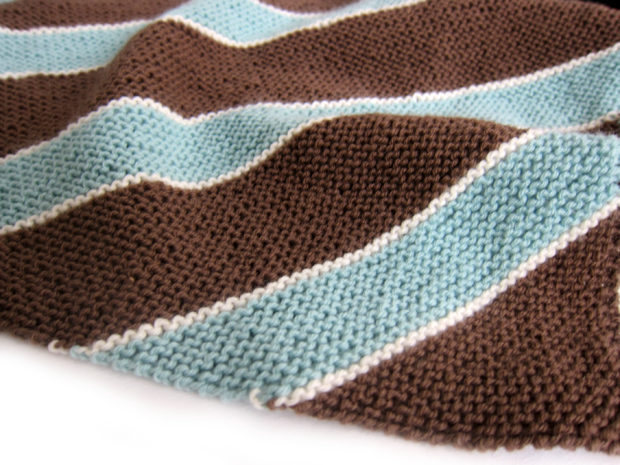
Here’s a close up:
Yummy, right? It’s a warm brown mixed with a cool blue, and they’re both similar darkness and a similar muted tone.
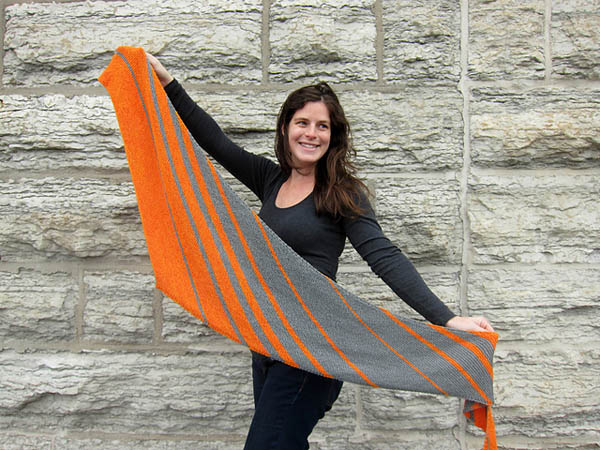
And do you remember Phi?
A cool grey plus a warm orange… both fairly dark. Delicious!
Dark grey and lime green? Oh, yeah.
Bonus: whenever you use different colors in a project, it’s an opportunity to stash-bust and use up some odd skeins you might have on hand! Stripes are a stash-busters best friend!
Have you done this before? What’s your favorite color combination?
Right now, you have 2 choices when it comes to crochet hooks. You can go to a store and purchase a hook that’s been made in the millions by a manufacturer or you can purchase a hand-carved, custom crochet hook.
In the future, I think there will be a third option. Hang on to your crochet hooks.
What’s wrong with the current options?
When a manufacturer makes a crochet hook, they’re trying to make one that will appeal to a large number of people. Their goal is to sell them by the thousands/millions.
While there are lots of different designs, there might not be a hook that’s perfect for you. Especially if you have small hands or a unique crocheting style.
The hand-carved hooks can be personalized (for example, to fit a smaller hand), but they are pricey. This makes purchasing one ‘just to try out’ out of reach for most consumers.
Crochet Hooks and 3D Printing
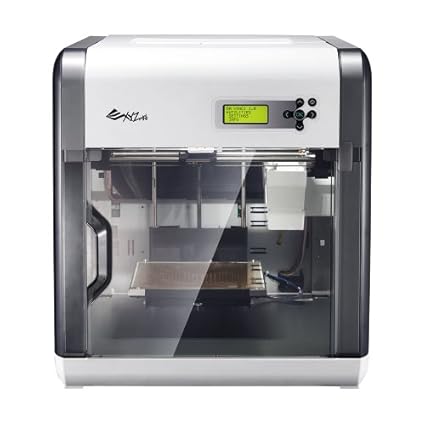
Have you heard of 3D printers? They’re basically printers that use a resin (instead of ink) to create a 3D item.
Less than a decade ago, these printers cost tens of thousands of dollars and were only used by researchers and companies. Now, though, there are a selection of 3D printers available in the $500 range, meaning they’re becoming practical for home use.
You probably have purchased a pdf pattern online for knitting, crocheting or sewing. These are usually patterns made by independent designers (like me!) that can be produced without the costs involved with printing & distributing a book.
This model allows independent designers to create patterns for niche markets. For example, a giant company might not be interested in spending thousands to produce a squid pattern, but as a pdf pattern (without much cost overhead), designing an adorable squid is practical! Yay, niches!
I predict the same thing will happen with crochet hook designs. You will be able to purchase 3D Printer Plans for a crochet hook, that you can print on your printer at home.
The cost of these plans would be similar to purchasing a pdf pattern, and would allow the customer to purchase a crochet hook almost exactly to their liking. Independent hook designers will cater to different hand shapes and styles, exactly as they do now with stitching patterns.
Isn’t that such a cool future?
What do you think? Do you see print-at-home hooks in your future?
Being a knitting/crochet designer is kind of a weird job. Being successful means being part designer, part webmaster, part marketer and part photographer. And you can’t go to school for it. (okay, you can go to school to learn to design, but not do all the other stuff!)
I learned it through the grapevine…
Most of what I know about ‘the biz’, I learned from other designers. Chatting on online forums. Talking in person at trades shows. It took me years to feel like I really got what was going on.
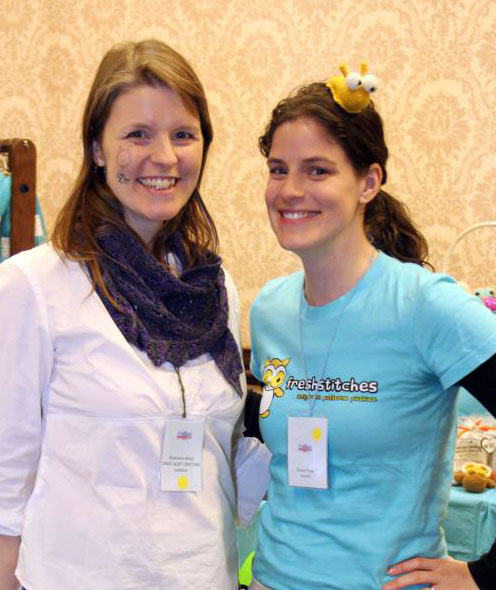
That’s me and Space Cadet pausing for a photo during a chat-session!
I can’t tell you how much I learned about marketing and my brand by chatting late into the night with other designers at conferences!
But now… the Reference Guide!
If you’re a newbie designer, you’re coming in at a great time! You don’t have to spend big bucks traveling to conferences to find out about the ins and outs of the industry… there’s a book about it!
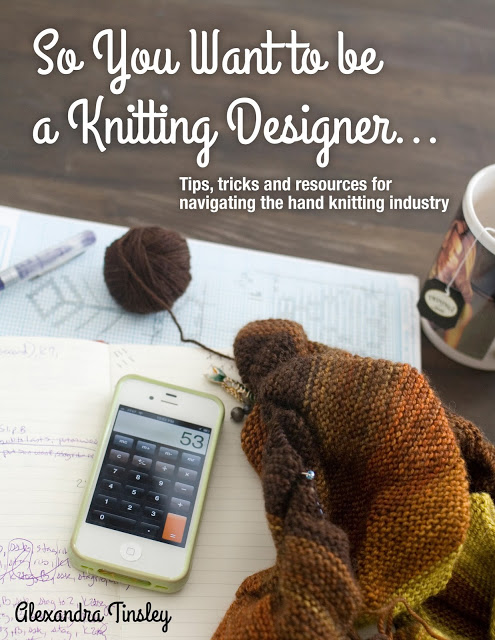
Alex Tinsley (designer behind Dull Roar and also Designer Liason with Malabrigo) has just written an ebook that tells you (basically) everything you need to know to be a knitting or crochet designer.
I just read it. It’s awesome.
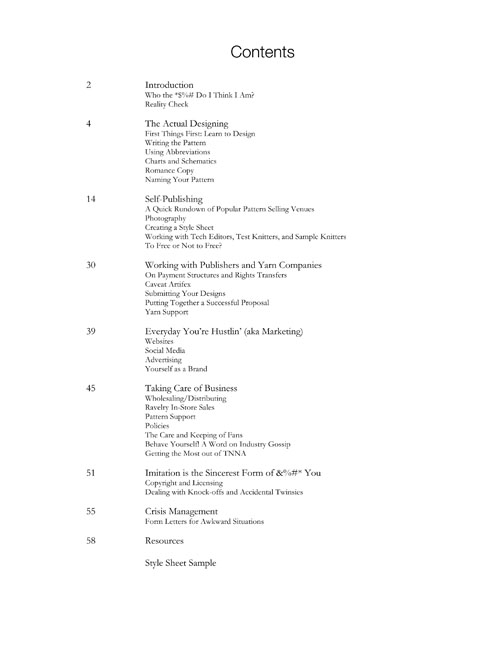
Not only is Alex hilarious, but the information in the book is dead-on. She gave me permission to post a looky-loo at the table of contents:
So You Want to Be A Knitting Designer covers how to write patterns, hiring a tech editor, photography, self-publishing, how to work with magazines, marketing, what to do if your idea is stolen, how to wholesale to yarn stores… you name it!
Is this book for you?
Alright, so let’s talk about what this book does and doesn’t do.
This book:
gives you real, authentic help for becoming a designer: including a pattern template, sample emails for sticky situations and advice about submitting proposals that you really need for real design life.
gives you a comprehensive list of resources for finding tech editors, hiring photographers and chatting with other designers.
walks you through the basics of the industry (including the dos and don’ts of asking for yarn support!) in a friendly and honest manner… from someone who’s worked in lots of different parts of the industry.
leaves you feeling confident about doing knitting design as a career (it’s hard, but not mysterious!)
Although the book has ‘knitting’ in the title, it’s equally applicable to crochet designers, too!
This book is intended to helping someone who’s seriously thinking of designing navigate the industry, and already has some knitting experience. It doesn’t contain lessons on how to design, detailed help with taking photographs or address the financial/tax/contract aspects of beginning a business.
Get it!
I would really recommend this book to anyone interested in becoming a designer (whether it’s part or full-time).
Not only does it distill lots of information that’s available in thousands of posts online into one fun & readable document, but it also contains a little bit of extra information that many designers aren’t always willing to post in a public forum (such as how much tech editors are usually paid and examples of email templates in sticky situations).
I’m so happy Alex wrote a book like this… the industry really needed one!
Especially after last week’s Wingspan debacle, there have been a lot of questions about originality and copyright. How can you tell if your new design is ‘different enough’ from someone else’s?
This is a really tricky question, and frankly, I’m not going to talk about the legal side at all, because I’m not qualified to do so. But, today I’m going to talk about some questions to ask yourself when you’re wondering if your new design is original and suited to publish.
I originally began knitting Mrs. Tumnus by Eskimimi, but the lace pattern on the edging was too thought-intensive for my current knitting brain, so I decided to simplify the pattern.
In the end, I used the short-row shaping from Mrs. Tumnus, but enlarged the entire shawl and added a garter stitch border (with its own short-row shaping).
Would I consider publishing this shawl as a new pattern? No. Because I clearly used the Mrs. Tumnus shawl as an inspiration and made modifications.
But now, let’s look at the interesting case. What if I had designed the shawl completely from scratch… would seeing Mrs. Tumnus prevent me from publishing my new pattern? Probably not.
Mrs. Tumnus isn’t the first shawl to use short rows, and if I had come up with the ‘Stacey Shawl’ completely on my own, I wouldn’t look at Mrs. Tumnus and say, ‘geesh, that’s mine in a different size with a different edging’. I would probably publish the pattern, and it would be a case of two designers having similar ideas.
Do you see the difference? If you just ‘tweak’ an existing design, that’s not as original as coming up with the concept yourself.
Is the design your own style?
Creating an original design is tricky because we’re all using the same components. I didn’t invent crocheting in the round, increasing or crocheting through the back loop. But I use these components to create my own style of patterns.
You want to make sure that a design you publish is in your own style, as well.
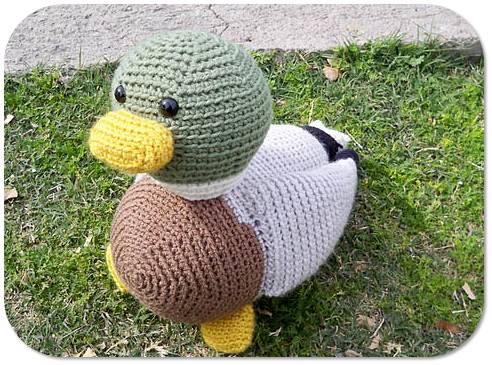
It’s crocheted through the back loop, in the round… but whoa! It doesn’t look like a FreshStitches pattern… this little duck has some fabulous shaping and color changes that represent Hollie’s own style. That’s fabulous!
What if you took my cow pattern and changed the ears so it looked like a pig? You see… that would look like another FreshStitches pattern, and isn’t really developing a different style.
A note about working from ‘inspiration photos’
It’s very tempting to look around online for cute photos… and with a little bit of skill, it’s possible to ‘reverse engineer’ a cute design: that is, crochet it without a pattern.
Is this your own design? Not really. If you’re crocheting an item that was designed by someone else (whether or not it’s an existing pattern), then you also aren’t creating your own design.
Follow your gut…
In the end, it’s up to you. While there are copyright laws in place, in practice, there isn’t much of a ‘copyright police’ going around that are going to investigate your pattern.
It’s up to you to only publish patterns that are original and uniquely your own.
This blog post isn’t an ‘answer’ to how to decide that for yourself, but I hope I’ve at least given you a starting point of some questions to ask yourself!
You might think that you need a whole bunch of fancy software to put together a professional-looking pattern, but it just isn’t true! You can put together a great-looking pattern using what you probably already have on your computer!
I’m going to assume that you already have written a clear set of pattern instructions, and I’ll give you tips to turn those instructions into a beautiful pattern!
Step 1: Take fabulous photos
You don’t need an expensive camera! You just need your product, some good lighting and a regular point-and-shoot camera.
The secret to good photography is taking oodles of photos. You can always delete ones you don’t like, but you want to maximize your chances of snagging that perfect one!
Don’t forget that in addition to the cover photo, you’ll want to take photos that show off any detail work or unique features of your design.
Step 2: Select your format
Chances are, you have a word processing program like Microsoft Word on you computer… great! You can use it for formatting your pattern!
Have a look at the features your program offers. Go to File > New. Is there an option of using a template? A template can be a great way to get started with the design of your pattern.
If you don’t want to go the route of the template, think about setting key elements of the pattern apart with simple design elements. Perhaps your materials listing could go in a colored text box. headers) to break up the text. Keep in mind that many people find a huge, solid block of text difficult to read, so use design elements (and headers) to break it up.
Step 3: Insert your photos
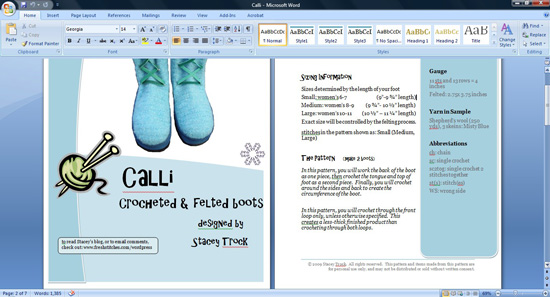
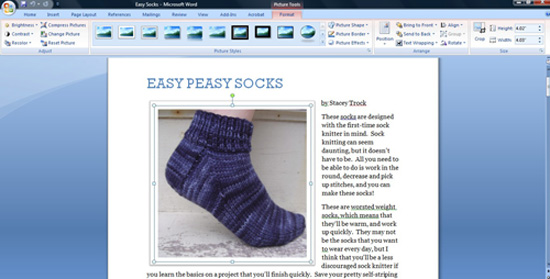
To insert your photo into a document, go to Insert > Picture, and pop in your selected photo.
Take a look at the top of the screen after you’ve inserted your photo… do you see formatting options? In my version of Word (above), you can see a variety of picture formatting settings: such as changing the shape of the photo or adding a border. This is an easy way to add a personalized style to your photos.
Step 4: Add your information
Do you want to add copyright information? How about putting your email address on the pattern so customers with questions can contact you? Or maybe you’d like to include your website?
Don’t forget these details… remember that the pattern instructions are a way to communicate with your customer! You want to make things easy for them… don’t make them hunt you down if they have a question!
Step 5: Try a font!
Once you have your text and photos in… you’re finished (and can skip to step 6)! This step is optional, and just adds a little extra to your pattern!
I’m a big fan of fun fonts, and downloading a new font is a great way to add your own sense of style.
My favorite website for browsing new fonts is dafont.com. There are two things to keep in mind.
One, be sure to read the conditions on the the particular font you’re interested in: fonts designed for personal use only aren’t intended to be used for commercial purposes. (…just like patterns!)
Two, most people find fancy fonts in the text difficult to read, so keep the fun stuff to headers and titles.
Step 6: Make a PDF
PDF stands for ‘portable document format’, and it’s called that because it’s a file that shows up exactly the same on every computer. You’ll want to convert your document into this format before it’s ready for distribution.
Fortunately, this is easy! In the old days, you needed fancy additional software, but now, it’s as easy as going to Print in your Word Processor and selecting Adobe PDF as your printer.
The result is your pattern… that’s ready to distribute!
Are you ready?
You shouldn’t let fear of technology or lack of a graphic designing degree keep you from putting together a pretty pattern that you can be proud of!
A lot of patterns going around at the moment feature stripes: two or three colors that go together perfectly.
You could follow the colors suggested in the pattern sample, but you want to try something a little different. But how in the world do you pick a colors that go together? Color theory. That’s how!
Picture the yarns on a color wheel
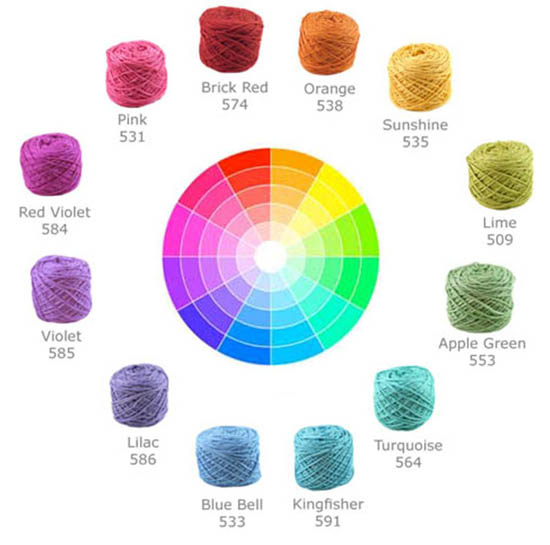
Most yarn lines contain a wide range of colors. Here’s a look at the color palette for Cotton Candy from Be Sweet:
Whoa! Overwhelming, right?
But don’t fret. To get started with selecting a pair of colors, imagine them organized around a color wheel:
It’s not all of the yarns, of course! I just picked a representative for each color wedge!
Most yarn companies design their colors of yarn with compatibility in mind. This is good news! It means that most yarns from a single line are of similar tone and will work together nicely… it’s just up to you to pick your fave color combo!
Color Theory 101
Fortunately, there’s a name for the art of picking colors that go together: color theory. Oodles of brilliant artists and designers agree on some fundamental color groupings. Phew! That means we can use what they’ve figured out to help us pick our color pairings!
There are three color schemes that, if followed, will create knock-your-socks-off color combos: analogous, complementary and split complementary. For help picking an awesome pair (or trio) of colors, stick with one of these schemes, and you can’t go wrong!
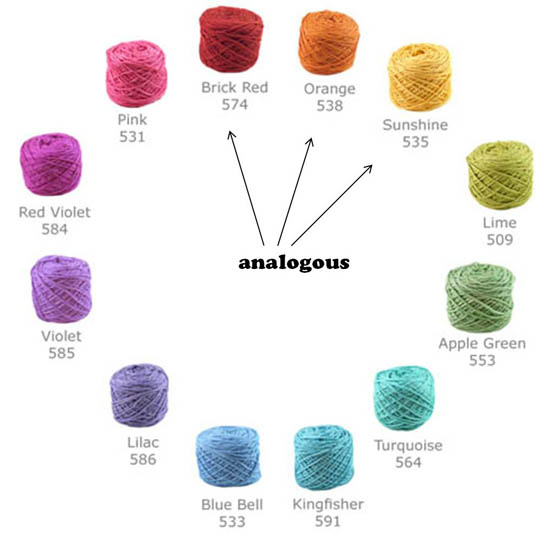
Analogous
Analogous colors are the ones that are next to each other on the color wheel.
This scheme can work with any number of colors – pick two that are next to each other, or three or four!
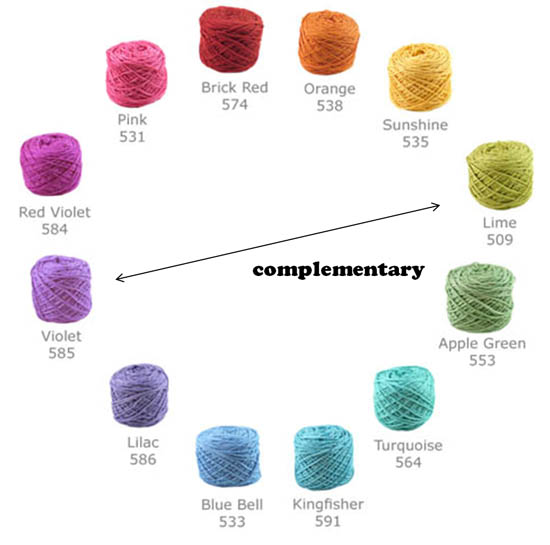
Complementary
For a color pair with a real ‘punch’, go with complementary colors – colors that are opposite each other on the color wheel.
I love using complementary colors. The difference in colors really highlights the striping/pattern in your knitting/crochet.
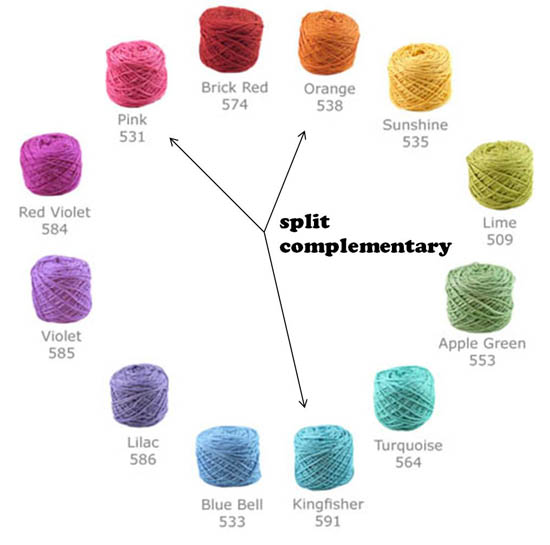
Split Complementary
A complementary color scheme gives you two colors… so if you want three, you’ll want to use the Split Complementary scheme. Here’s how this one works: start with one color. Zip across the color wheel to its complementary color, and select the two colors on each side of it.
Are you ready to hop into color?
See? It’s not so bad. The color wheel is your friend!
By using one of these color schemes, you’ll be able to put together a beautiful color combo! (I know I’ve started eyeing the blue + pink + orange one!)
Thanks so much to Be Sweet for permitting use of the photo of their lovely yarn to use as examples!
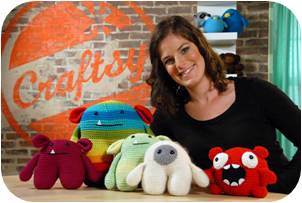
I teach people to crochet. More specifically, I’m very keen on teaching folks how to crochet adorable stuffed animals. I also teach crocheters how to create their own stuffed animal designs.
This last aspect of my chosen career has raised some eyebrows. I’ve been asked, “Aren’t you diluting your brand by teaching others to crochet like you?” and “Aren’t you creating your own competition?”. Wow. Big questions.
Today, I’m going to chat about my answers to questions, and share with you the reason I teach design: because folks from my classes are becoming designers and releasing their own patterns… and that makes me ecstatic! Isn’t that why teachers teach? To see students put to practice what they learned? I think it is!
FAQ: Fears about teaching design
I understand where these fears come from. It’s tough to make a living selling $5 patterns, and so there’s a natural defensiveness that can arise.
But I don’t think of my job as competitive. My job is to publish high-quality crochet patterns featuring designs in my own, unique style. And people who like my style might buy my patterns.
It’s hard for me to get my tail feathers in a ruffle when a new designer comes along. Miss New Designer has her own style! Some people will like it, and that’s okay. People will still like my patterns.
I’ll answer a couple of frequently asked questions.
Q: Don’t you think that teaching other people to design in your style will dilute your brand?
No, I don’t.
First, I teach certain techniques (like crocheting through the back loop and crocheting spiral rounds) because I think these create a better crochet fabric & overall design. In my opinion, these are techniques for your crochet toolbox, not ‘secrets’ of my style. I wasn’t the first person to ever use the back loop in crocheting, and I won’t be the last!
Second, ‘my style’ is something that’s difficult to teach or copy. My style is the ideas that pop into my head. My style is my judgement call about whether a nose looks better attached to round 8 or 10. I’m not trying to teach ‘my style’ because I’m not sure that I could! What I teach is methods for allowing crocheters to express their own style in the form of a unique design and, if they want, a crochet pattern.
Third, my brand is more than just my designs. My brand is a reputation for incredibly clear and photo-rich crochet patterns. It’s my commitment to replying to questions via email in a quick and helpful manner. It’s my blog, full of tutorials and videos. None of those things are diluted by teaching others to design.
Aren’t you afraid you’ll sell fewer patterns if there are more designers?
Not really. Keep in mind: there are always going to be more designers! You can’t stop that.
A revised question might be: can there be too many crochet stuffed animal designers? And I don’t think so. There’s a very interesting phenomenon that happens: the more people do something, the bigger the niche grows.
I’ll give you an example. Let’s pretend you were a computer manufacturer in 1980. You were probably one of the only two manufacturers in existence. But, there were only a few thousand people using computers. What happened over time? The more manufactures built computers, the more customers bought computers. Which meant that owning a computer was more useful: more friends had them and more software was being made. The entire niche grew. Now there are dozens of manufactures, but there are billions of users. The number of customers per manufacturer has increased, despite increased competition.
And that’s how crocheting is. It’s a myth that there are x number of crocheters out there that us designers are fighting for. As more people crochet, it’s more likely someone will think, “hmm… my friend makes those cute animals, maybe I’ll give it a try!” We’re constantly adding to the pool of crocheters.
Is someone going to steal your designs?
Here’s another truth: if someone is steal your design, they’re going to do it. In fact, oodles of crocheters already have the skills to copy a design, even without the benefit of my fabulous teaching skills.
I’m not making the problem any worse by teaching crocheters to design. I’m training crocheters to come up with their own designs! To put in yarn ideas that come from their own heads! If anything, I think I’m solving the problem of knock-off-ing.
Anyway, every student I’ve had (in real life or online) has been a real joy. Once we’ve spent hours together, it feels like we’re friends. If anything, it’s my students who are the most protective in online forums about my rights as a designer. Because we’ve built a relationship of trust. They’re not in it to steal my designs or hurt me!
Meet who makes me happy!
Okay, now onto the fun stuff!
I want to introduce you to two ladies who make me deliriously happy. They’re students of mine who are budding designers!
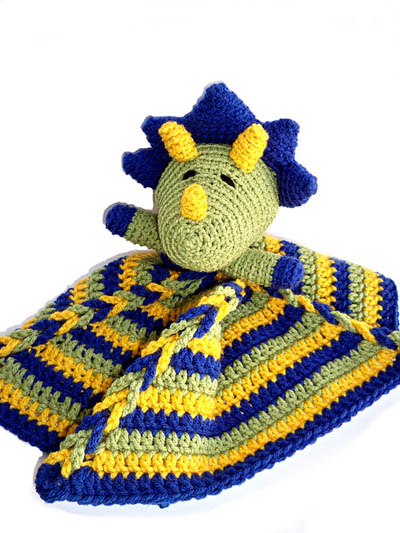
Hollie!
Hollie is a sweetie, who also happens to be one of the moderators in the FreshStitches Ravelry group. She’s the one who puts together the amazing swaps that happen in the group, and also the one who surprised me with the FreshStitches Cowl that I chatted about as being one of my fave pieces.
Introductions aside, Hollie just published her first pattern this week!
It’s a Triceratops Lovey… and isn’t it amazing? The triceratops is just stinkin’ adorable, and the detail on the lovey is fantastic. I couldn’t be more thrilled!
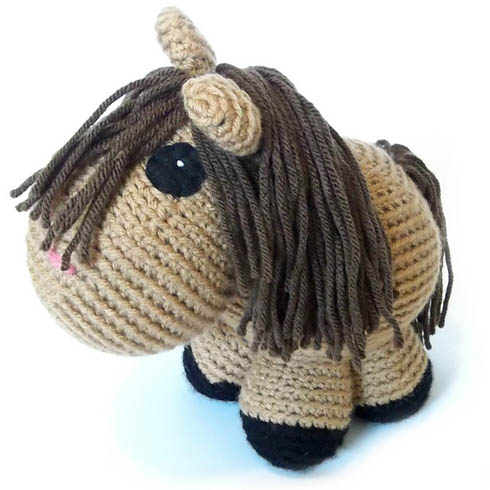
If you follow this blog, you know Alyssa! She’s the author of the much-loved What does Amigurumi Mean? blog post and also winner of the Slug-a-long. Alyssa is a smartie with a fabulous photographic and styling eye.
Alyssa also just completed her first design:
An adorable horse! It’s still in the pattern-development stage, but rumor has it that it’ll be released as a pattern next month. So exciting!